
|
The Internet's Largest and Fastest Growing Engraving Community
Discuss hand engraving using basic to the most advanced methods and equipment
Forum Members: 14,739. Welcome to our newest member, KarriG
EngravingForum.com -
Domain since Feb 7, 2003
 Graver Video Conferencing is empty Join now!
|
|||||||
| ENGRAVING TOOLS - Paypal accepted | Classes | Glossary | Feedback | Tips | Sharpening | Bulino | Videos | Forum Policies |
 |
|
|
Thread Tools |
|
#1
 12-06-2012, 06:16 PM
|
||||
|
||||
|
Hi Everyone,
I have been working with Steve Lindsay and Mike Dubber to develop a new engraver template set to make a graver to help in the cutting of inlay channels for gold wire. We have worked on this project for quite some time and we are now ready to release the template set. Below is a tutorial that I wrote to describe the new graver. I hope that it explains all of the details of the making and use of the graver. If there are any questions please let me know. Les Gold Inlay and Undercut Graver Template The purpose of this graver is to help the Engraver to cut uniform inlay channels for gold wire (or any precious metal, or copper wire for that matter) and also to undercut the sides of the channel in order to hold the gold wire in place. The Engraver would normally have two gravers in order to prepare a given channel size for inlay, each with a different sized face: one graver, with a larger face size to cut the channel, and a second graver with a much smaller face size to undercut the sides of the channel in order to hold the gold wire. This graver geometry is also intended to be used to enlarge the lettering which is stamped into firearms (on a Single Action Army this would be on the barrel) in order to inlay gold wire into the lettering. The smaller faced graver is used for this purpose. Please check out the photo of the Single Action Army revolver below to see and example of this type of gold inlay. 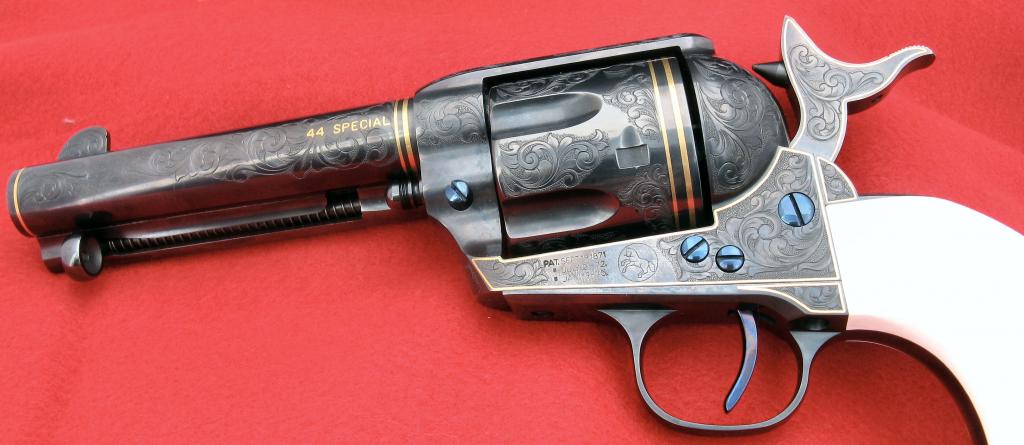 A third use of the smaller undercutting graver is to undercut gold inlay channels, which have been cut by a lathe, in the cylinder or barrel of a revolver. This little graver does a wonderful job of undercutting the channel in order to hold the gold. Making the graver point: This template set includes 2 templates: A round template which is used to generate an initial conical point, and a second template which is used to cut the face and the heel on the newly created conical point. The size of the face is then determined by how far the face is cut down the conical form. If everything is done properly the face on each graver will be of an oval shape which will simulate an onglette graver. Please note that the Engraver can make whatever size face that he feels is appropriate for the desired channel size (gold wire diameter) and the undercut simply by controlling how far the face is cut. To start, put the Lindsay sharpening fixture into the round template and then set up a graver blank in the fixture. Work the point of the graver, using the TW Designs Power Diamond Hone. First cut the corners of the graver blank, working the cuts to form a point symmetrically around the graver blank. Note that you are attempting to create a symmetric cone. Once the corners have been cut symmetrically, start working on the flat surfaces of the graver and work them into a symmetrical cone shape. When you are finished with this step, the graver point will be a faceted version of a conical shape. Once the corners and the flats of the graver have been cut as closely as possible to the shape of a cone, the graver can be hand rotated with the cone point against the spinning diamond hone to remove the facets and smooth out the cone shape. The graver blank can also be put into a Lindsay Quick Change Extension (purchased separately) , the extension can then chucked up into a hand drill, and the cone of the graver point turned against the power hone using the rotating motion of the drill to make a perfect cone. Before chucking the graver up in a hand drill, it is recommended that a black sharpie be used to color the faceted cone in order to help see exactly where cone is being cut. Note: if the Quick Change Extension is used in this manner, both screws need to be used in the extension to hold the graver blank. The screw on the corner of the blank is to be tightened while the screw on the flat side of the blank is just snugged up to hold the graver blank in place. Tightening the screw on the corner not the flat side - ensures that the graver is centered in the extension. With the cone shape cut on the point of the graver, the Lindsay Sharpening Fixture and graver must be moved to the second template recheck the length of the extension of the graver point from the fixture. The face can now cut using Steves diamond stones. First cut the face to the desired size. Second, very gently cut a rounded heel on the graver point. It is recommended that a ceramic stone be used for cutting the rounded heel. Only 2 or 3 passes over a ceramic stone is all that is needed, hand turning the graver point with each pass. 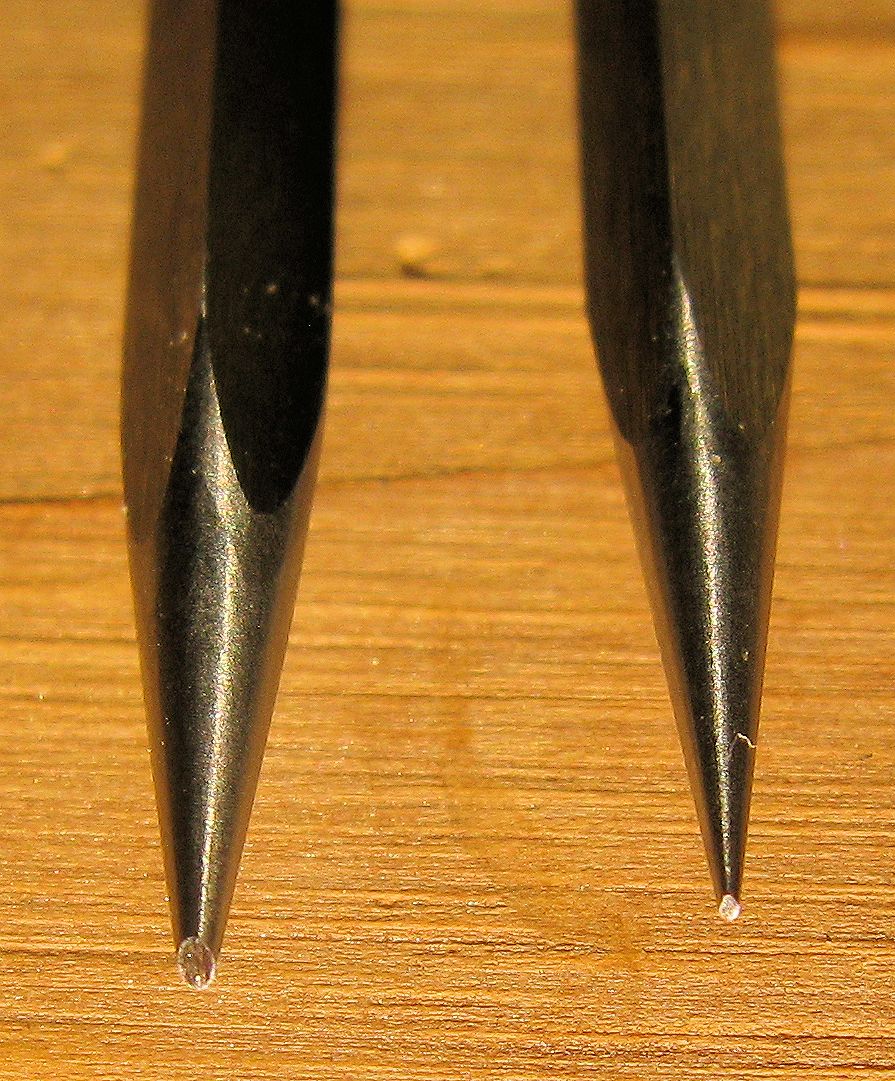 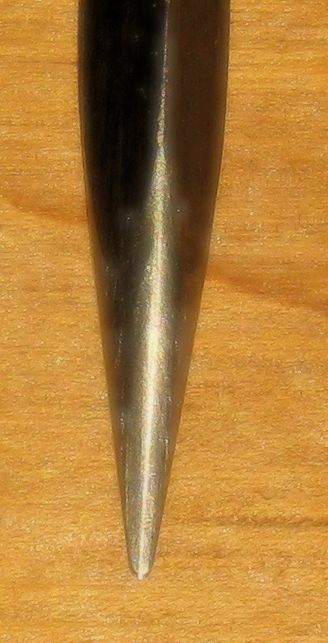 Using The Gold Inlay and Undercut Graver: 1) Cut a line with the Lindsay Universal Point to define where the gold inlay channel is to be. 2) Follow the cut line with the larger Gold Inlay Graver. Keep cutting over the line until the inlay channel is cut to the appropriate depth. 3) Use the smaller Gold Inlay Graver to undercut the sides of the channel. 4) Use the Roland Baptiste Chisel graver made by Steve Lindsay to freshen up the undercut. Not too much because you do not want to rise up the edge of the steel channel. 5) Hammer in the gold wire. 
|
|
#2
12-06-2012, 07:22 PM
|
||||
|
||||
|
Les,Beautiful engraving on the Colt
 ,thanks for sharing the information on the gold inlay. ,thanks for sharing the information on the gold inlay. J.J. J.J.
|
|
#3
12-06-2012, 08:18 PM
|
|||
|
|||
|
If I understand you correctly after you use the larger graver to cut the 'main channel' the smaller is used to cut a round undercut on each side and deepening the undercut with Roland's inlay graver? I assume the larger round graver used to insure the line is even, as a round it should cut an even line as it cuts past center without tearing out the sides, brilliant. I'm just about ready to start attempting inlaying, perfect timing, thanks.
 Bob
|
|
#4
12-06-2012, 10:59 PM
|
||||
|
||||
|
Thank you for the info sound interesting i hope can try the new template point soon!
__________________
www.mrthehobonickels.com
|
|
#5
12-06-2012, 11:05 PM
|
|||
|
|||
|
Hi Les,
Where are and how can one acquire the gold inlay and undercut template set ? Is it yet to be released ? SE 
__________________
Learn from those who know more than you do and teach those who know less than you do. - I.M.
|
|
#6
12-07-2012, 07:17 AM
|
||||
|
||||
 The process of developing these gravers has taken considerable time and effort. Thanks to Les Schowe for all the work that went into the development of the Gold Inlay and Undercut Template Set. Thanks to Steve Lindsay as well for producing numerous experimental templates during the process of making a set of inlay gravers that work! The process of developing these gravers has taken considerable time and effort. Thanks to Les Schowe for all the work that went into the development of the Gold Inlay and Undercut Template Set. Thanks to Steve Lindsay as well for producing numerous experimental templates during the process of making a set of inlay gravers that work!The attached photos show a Colt Diamondback that I competed all of the gold inlay using Les Schowe's new gravers made with these templates. I sent the gun off for bluing this week, but I wanted to post these current with the announcement even before the gun is blued and reassembled. All the gold borders,as well as the barrel lettering and Rampant Colt were inlaid exclusively with the first set of Gold Inlay and Undercut Gravers Les and Steve produced. The work was competed as described in Les's tutorial. I estimate that I saved four or five hours of work on this Colt compared to the way I formerly inlaid gold borders. Once again, these gravers work, and they are time savers as well. What was even more surpising to me was that I completed all the inlay on this Diamondback without breaking or resharpening the gravers - that was amazing! If you know anything about engraving the Colt Snake Guns, you'll appreciate that the cylinders and barrels are rather hard and tend to break gravers more than the frame. If you are looking for a set of graver templates for gold inlaid borders, try these. Using the Gold Inlay and Undercut Templates will create gravers that work - they will speed the process of inlaying while creating secure inlaid gold and silver borders!  
|
|
#7
12-07-2012, 09:31 AM
|
||||
|
||||
|
Looks good Mike, a little different style than you usually see from your studio. Reminds me of that Eaton/Churchill colt by the volume of scroll.
__________________
"If one needs a tool, and does not acquire it, they end up paying for it, but not having it." - Henry Ford
|
|
#9
12-07-2012, 11:17 AM
|
||||
|
||||
|
Quote:

|
|
#10
12-07-2012, 12:39 PM
|
||||
|
||||
|
I can see it now... take two of these and call me in the morning.
__________________
"If one needs a tool, and does not acquire it, they end up paying for it, but not having it." - Henry Ford
|
|
#11
12-07-2012, 01:11 PM
|
||||
|
||||
|
Quote:
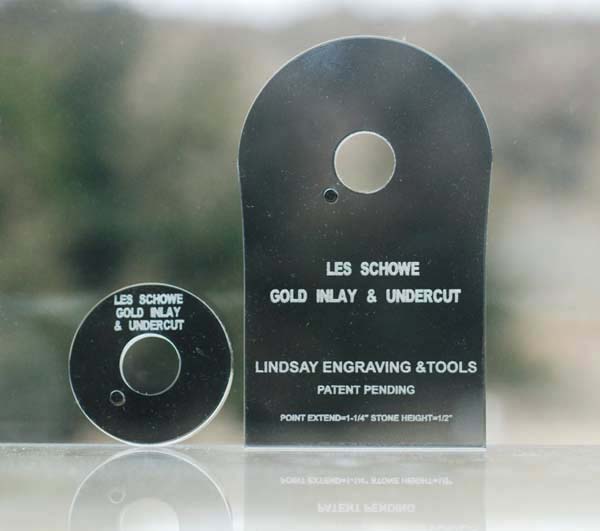 Les Schowe Gold Inlay & Undercut Template $24.00  __
__________________
__________________________________ Steve Lindsay AirGraver.com EngravingArtist.com
|
|
#12
12-07-2012, 01:19 PM
|
||||
|
||||
|
Cool! another helpfull template! i suppose that can be used too like a common round graver point true?
__________________
www.mrthehobonickels.com
|
|
#14
12-07-2012, 04:51 PM
|
||||
|
||||
|
Thanks for all of the replies and interest in this graver geometry:
JJ Roberts: Thanks. If you are interested in seeing some much higher resolution photos of my engraved guns please check here: http://www.engravingtransfers.com/page26.html The gun that I posted is a USFA SAA replica and is displayed at the bottom of the page. I have a Colt at the top of the page. Redgreen: You are exactly correct. I used to use a square graver to make the initial cut and then a flat graver to cut my channels. I also used various types of chisels to make the undercut. The problem is that the flat graver tore up the outside edge of the channel on a curve, and because I am not steady enough, the width of the channel was also not constant - I hate that. This graver will not tear up the outside edge of the channel, it will follow the initial cut perfectly. I use the Baptist chisel to make the undercut uniform and to give me a little more undercut. Note that the small gold inlay graver removes metal and the Baptist chisel displaces metal. If all you do is to displace metal then you raise the edge of the channel, and then when you sand everything off there is an unsightly edge left on the final product. SE: I think that Steve has posted the graver template set now. I guess that we were not exactally in sync. Mike: Thanks for the recommendation!!! Mrthe: That is the neat thing about this graver point. It is not round point but oval point. It is a cheap-and-dirty way to simulate a ongellete graver. Les
|
|
#15
12-07-2012, 06:44 PM
|
||||
|
||||
|
Les,Have you ever though of doing a step by step video on the use of you new gold inlay and undercut template set?
J.J.
|
|
#16
12-07-2012, 07:44 PM
|
|||
|
|||
|
Inlay done quicker and better, sounds like another no brainer template purchase to me
 Thanks for making all these tools available to the engraving community. Maybe I should say toys Thanks for making all these tools available to the engraving community. Maybe I should say toys
|
|
#17
12-08-2012, 05:40 AM
|
|||
|
|||
|
Quote:
Thank you for the update,I have placed a request for a set.The template family is getting bigger and better. Hi Les - Thanks for the response,I look forward to using the template.I believe congratulations are also in order. I would request the same as JJ Roberts for a step by step video demo please,time permitting. SE
__________________
Learn from those who know more than you do and teach those who know less than you do. - I.M.
|
|
#18
12-08-2012, 03:20 PM
|
||||
|
||||
|
Thank you Les for the answer, i will try it sound great! Thank you to you and Steve for this new point!
__________________
www.mrthehobonickels.com
|
|
#19
12-08-2012, 04:42 PM
|
||||
|
||||
|
Hi everyone,
I have some more info and some words that I would like to pass on in regards to the use of the Gold Inlay Graver to inlay gold inlay channels of firearms: 1) The size of the width of the Gold Inlay Graver points that I used for the SAA firearms shown on: http://www.engravingtransfers.com/page26.html are (You can use this sizing as a starting point): a) Width of the large graver: .023 inch, 26gauge (.016 inch) gold wire b) Width of the smaller graver: .013 inch 2) Please, cut some wire channels on practice plates and install some copper wire there, or gold wire if you are a little richer, before you attempt to cut channels on a firearm. Get used to using these gravers before you are cutting for real. You can purchase some really nice "Dead Soft" copper wire from Rio Grande very inexpensively and it goes in close to gold wire. 3) In you practice, as described above, determine which size graver point you want to use with which diameter gold wire that you would like to install. Do this before you cut on a gun. These are words to the wise learned from my own personal experience. Les
|
|
#20
12-09-2012, 10:24 AM
|
||||
|
||||
|
Hi Les,
Thank-you for your PM .... I was concerned that my questions would be perceived as kinda hard ball. Initially, I found the photos of the different gravers a tad confusing however I understand now that it is the same point but of different sizes. I still have a question or 2 about this setup ... both directly and indirectly related to "time". How many gravers are you using in the process? I am counting 3. 1. A universal, 2. the new graver, 3. the Roland undercut tool. Is the Roland undercutting tool necessary? More tools = more cuts = more time. Is there a suggested amount of time to complete each inlay ... a benchmark for this method? If this technique is a time saver, times will be useful in comparing to other inlay techniques such as my own. I think the easiest benchmark to illustrate would be either of the gold bands on the cylinder. Also ... which graver material are you using? Personally I prefer M42 for tools such as this as carbide is too brittle and HSS tends to literally bend. Finally .... Have you used this tool on stainless steel? Smith & Wesson or Ruger stainless specifically. They should be adequate in determining how well the points hold up as traditional square gravers crumble quickly in that stuff. Thanks again .... my questions are primarily geared for anyone who is re-evaluating their own techniques rather than for the newbie. Chris
|
|
#21
12-09-2012, 01:58 PM
|
||||
|
||||
|
Hi Chris,
Good questions. Inlay process: I guess that I should not have confused the way that I have learned to inlay gold channels with the description of this channel cutting graver set. These gravers are simply a way to cut and undercut a gold inlay channel, anything else that the Engraver wants to do to help hold the gold in even more securely is up to him. I do refresh the undercut with Rolands chisle because I think that it helps, but it is not required. (on a knife or jewelery it is probably not required) It is actually a very fast process once the small undercut graver is used. Simply hold the chisel at a slight angle and rotate the cylinder or barrel - it just cuts right along. I do have a palm Control Classic, but I configure the tool as a foot control for most of my gold inlay steps. While we are on the subject of how I secure the gold, here is something else that I do (I learned this from Mike Dubber). If anyone were to actually put a .45 Colt round in one of my guns and fire it, I do not want the gold to come flying off the gun. I use a narrower version of Roland's chisel to raise up teeth in the bottom of the channel of the cylinder and barrel and ERH - this does take some time. I cut the teeth at about a 15 degree angle from perpendicular and then hammer the gold wire in against the grain. That gold ain't coming out unless you chisel it out. You know Chris, you have to temper everything that I say with the fact that I tend to over-do everything. You mentioned in your reply about your method of cutting a channel. I would be interested in hearing about that. M42: I use Steve's M42 blanks for everything and it has never failed to do the job. It is a very strong and tough material and I think it is the best in the industry - my opinion, of course. I do have a couple of Steve's carbide blanks but I have never used them. Mike tells me that I will probably need to use the carbide blanks on the Ruger Vaquero loading gate that I am currently engraving - we will see. I will say one more thing about M42 and this graver geometry: I inlayed all of the gold wire on my Colt SAA and never sharpened the face or the heel - that was 34 hours of total gold inlay work - I'm slow. I'll take that back, near the the end I did feel guilty, I checked the cutting surface under the microscope, it looked perfect but I did freshen it up a little using only a ceramic stone. Stainless: I personally do not think that gold stands out on stainless, as it does on a blued gun, so I have therefore never cut inlay channels in stainless steel. I have however, cut carbon steel and stainless steel with an M42 Universal point and I have had absolutely no problem with either metal - so far!. The stainless is a little tougher, thus I use a little more power, but it works fine. I also think that my gold inlay point is, by definition, a stronger point than the Universal point so I would conclude that the gold inlay point would work just fine on stainless. Check out Mike Dubbers reply up above someplace. He describes his use of the graver set on a Colt Diamondback. Hay, it only cost $24 -- give it a try. Les PS: I just wanted to give anyone who has read this far a little gift. I have found a wonderful product for use with Steve's template system. These are ceramic stones made by Brownells. They are sized at .5 X .5 X 6 inch. I put diamond spray of the dark brown stone which is the most aggressive. The only problem is the .5 inch dimension, although it allows the stone to be used with the sharpening system, is small and it is easy to come off the stone while sharpening and thus trash the graver point. These are very inexpensive (if you get the Brownells discount the set costs only $35.84) for what they are, here is the pointer: http://www.brownells.com/gunsmith-to...s-prod799.aspx
|
|
#22
12-09-2012, 10:43 PM
|
||||
|
||||
|
Hi Les,
Thank-you for the reply. Sometimes I wonder if maybe I've put too much time into what goes on under the surface when it's the surface that counts. Over-engineering is something we're all guilty of at one point or another I think. My technique is similar except for the round chisels vs. the flats that I use. Flats are ok in most cases but it is the indirect loss of time that seems out of control as resharpening between inlays can become quite frequent. Stoning down the raised edges when using the displacement method of undercutting is another time loss that should be avoided when possible. Some of my flats are made from knife gravers and are very thin for inlaying filigree wire which I draw to as small as .15mm. The flats are extremely delicate and tend to require a lot of resharpening in anything harder than soft 416 stainless or 19th/early 20th Cent. steel. The round gravers will certainly provide a more durable cutting tip for this purpose and probably will require no more time to make as re-configuring a knife graver into a flat. One thing is for certain, it's not easy to put a round heel on a chisel free hand and a template like this is a no-brainer. It all makes logical sense .... many thanks again. As I get closer to the next project I'll give these chisel configurations are try. Chris P.S. Instead of diamond spray on the stone ... you could always try a little Moet and make a champagne spietzer.
Last edited by WVEngraver; 12-10-2012 at 09:49 AM. Reason: added
|
|
#24
12-19-2012, 03:55 PM
|
||||
|
||||
|
Hi Cloudy,
I am happy to hear that you were able to make the gold inlay gravers and use them. Just out of curiosity, did you use Steve's "Quick Change Extension" and hand drill as a aid in making a symmetrical conical point on the graver? Also, did you make both sized gravers and use both gravers to cut and then to underlay the channels. Les
|
|
#25
01-28-2013, 04:27 PM
|
|||
|
|||
|
works well. i had always made my own rounds for my line inlays. worked well. this template is much faster and cleaner. i can resize as needed for the diameter of material. the heel idea is a real plus. i have done some basic line boarders for a colt cyl. photo examples. i cut the bands with the lathe, as usual to size. as of now i still use the knife cut for the undercut . it has always worked and is very quick. i see no use for the undercut tool in that it can create a channel bigger than the wire is to fill it . i used a .016 wire in these lines and tryed a .08 undercut chisel. worked ok , but the knife and displacing for me worked better. i respect the way anyone else may inlay , but this is the way i was taught . hope i can help someone with this subject . any questions i will try to answer. got this new camera for christmas and had to try it out. john pilk
|
|
#26
01-31-2013, 01:55 AM
|
||||
|
||||
|
Hi John,
I am of the opinion that "If it ain't broke, don't fix it" If the knife graver works for you to undercut the channels then keep using it. I use the knife graver quite a bit for other purposes, it is a good point, but when you narrow it down for undercutting a channel it is just not strong enough for me. In the past I used the knife graver point to undercut channels. I found that the knife graver point is very weak and, with my clumsy engraving, I would literally shatter the point very quickly. The small inlay graver that I am recommending here, which can be made with these templates, has the advantage that it is very much stronger than the knife point for underlying a channel. I can work for hours with this geometry and never break, or damage, the point. This is true for the carbon steel in the Colt and US Firearms revolvers, I am not sure if this is true on the Ruger stainless steel SAA's - that stuff is tough. As a side note, the small undercut graver can be used, very effectively, to cut lettering channels for gold inlay. I use this point to refresh the stamped lettering on the barrel of the Colt and US Firearms Single Action Army Revolvers. Les
|
|
#27
01-31-2013, 08:50 PM
|
|||
|
|||
|
Les, these graver profiles would work great for some of the lettering I do on custom barrels. I made my own but the templates would make the process much easier and faster. I'm assuming you can adjust the dimensions to suit different size channels. Am I correct?
|
|
#28
02-02-2013, 02:24 PM
|
||||
|
||||
|
Hi Big-Un,
Yes. The initial shape of the graver is as perfect a cone as you can get. Then, the size of the face, and therefor the size of the inlay channel, will depend on how far down on the point that you cut the face. Below is an example of my cutting lettering on a US Firearms SAA barrel: Les
|
|
#30
03-13-2013, 09:25 PM
|
||||
|
||||
|
Tried the set out today on a straight line inlay and loved it. Fantastic templates and a joy to use the gravers. Thanks Les!!
|
|
#31
10-17-2014, 07:34 PM
|
|||
|
|||
|
How would this template work on some curved surfaces? Has anyone tried it?
|
|
#32
10-18-2014, 10:23 AM
|
||||
|
||||
|
Carlos ,work well i use this point in all the types of surfaces and work great.
__________________
www.mrthehobonickels.com
|
|
#33
10-18-2014, 10:42 AM
|
||||
|
||||
|
I just used it to cut for inlay around the top of a bolt knob , works great
|
|
#35
01-29-2017, 09:15 PM
|
|||
|
|||
|
Finally got around to using the les schowe template today. Bought it s few months ago. For the first step I chucked a hss graver in my Dremel tool and ran it against my belt sander. Got a nice conical tapper. Then I used the face / heel template with Steve's diamond stones. Worked out great, very pleased.
Thanks
|
|
#36
01-30-2017, 03:37 AM
|
|||
|
|||
|
Quote:
|
|
#37
01-04-2018, 08:06 AM
|
||||
|
||||
|
I use Steve's iron lap disk (with diamond paste) to hone heel on tool using Les' templates....works great, creates uniform heel and is fast.
|
|
| Bookmarks |
| Thread Tools | |
|
|


 Somebody tell me about the 'Speitzer Point Template', Steve, Mike?


